
| 일 | 월 | 화 | 수 | 목 | 금 | 토 |
|---|---|---|---|---|---|---|
| 1 | 2 | 3 | 4 | 5 | 6 | |
| 7 | 8 | 9 | 10 | 11 | 12 | 13 |
| 14 | 15 | 16 | 17 | 18 | 19 | 20 |
| 21 | 22 | 23 | 24 | 25 | 26 | 27 |
| 28 | 29 | 30 |
- spoofing
- arp
- dreamhack
- Bandit Level 1 → Level 2
- overthewire
- Side Chanel Analysis
- 시스템해킹
- Crypto
- Differential Power Analysis
- rao
- AES
- dns
- cryptography
- bandit
- CSRF
- OverTheWire Bandit Level 1 → Level 2
- Hamming Weight
- picoCTF
- Side Channel Analysis
- return address overflow
- redirect
- RSA
- ChipWhisperer
- 부채널분석
- 웹해킹
- shellcode
- XSS
- Correlation Power Analysis
- 암호학
- 드림핵
- Today
- Total
만든 블로그
AES 펌웨어 구현에 대한 CPA(Correlation Power Analysis) 본문
아래 강의에 사용된 내용과 코드를 참고 및 사용하여 쓴 글입니다.
Lab 4_2 - CPA on Firmware Implementation of AES
chipwhisperer-jupyter/courses/sca101/Lab 4_2 - CPA on Firmware Implementation of AES (MAIN).ipynb at fe7e2aa1585798c3a5a6b247f23
Interactive ChipWhisperer tutorials using Jupyter notebooks. - newaetech/chipwhisperer-jupyter
github.com
CPA (Correlation Power Analysis, 상관관계 전력 분석)
CPA는 암호화 장치가 작동할 때 소모하는 전력량과 처리 중인 데이터 사이의 통계적 상관관계를 이용해 비밀 키를 알아내는 부채널 공격(Side-Channel Attack) 기법이라고 구글 AI가 알려줬다.
실제로 글 뒷부분에서 보이겠지만
해밍 가중치 모델과 실제 키와 관련된 연산 결과의 전력 트레이스 캡쳐가 선형적인 관계가 있음을 이용하여 키를 구하게 된다.
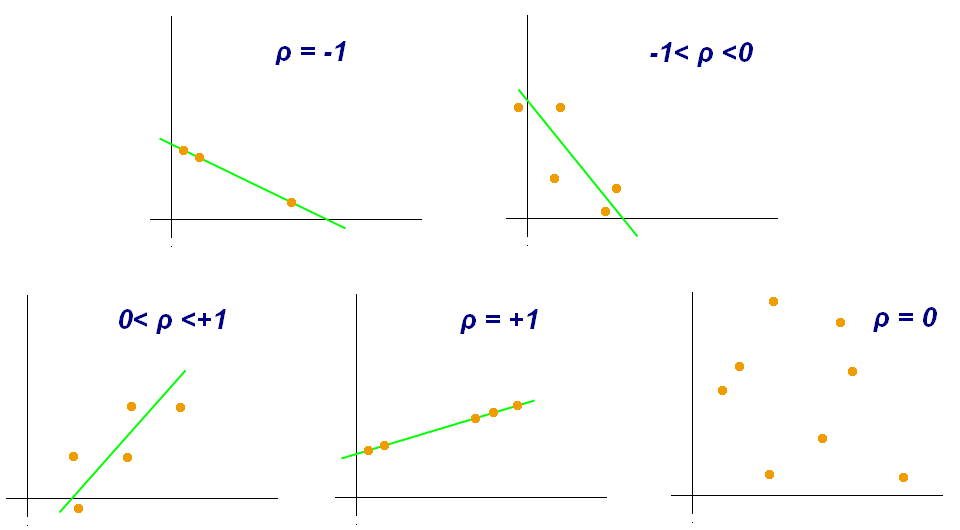
피어슨 상관 계수 (Pearson Correlation Coefficient, PCC)
먼저 피어슨 상관 계수에 대해 알아야한다.
피어슨 상관 계수는 두 연속형 변수 간의 선형적 관계의 강도와 방향을 -1에서 +1 사이의 수치로 나타내는 통계 지표라고 구글 AI가 알려줬다.
실제로 두 변수 간의 선형적 관계를 [-1, 1] 범위로 표현하여 나타내준다.
피어슨 상관 계수의 계산 공식은 아래 이미지와 같다.


피어슨 상관계수는 다음에 다뤄 보도록하고,
피어슨 상관 계수 r은 -1 ≤ r ≤ 1 의 범위이다.
r의 절댓값이 1에 가까워 질수록 두 변수가 선형관계에 가까워짐을 의미하며, 양수는 양의 기울기로, 음수는 음의 기울기로 선형관계에 가까워짐을 의미한다.
이 피어슨 상관 계수를 통해 CPA를 하게 되는데 이전 글인 해밍 가중치와 전력 소비의 관계 에서 해밍 가중치 모델이 전력 소모에 대하여 선형적임을 보였다.
즉 CPA의 핵심은 "추측한 키가 올바를 때, 전력 트레이스와의 관계가 선형적이다."라는(=피어슨 상관 계수의 절댓값이 1에 가까운)것을 활용하는 것이고, 이를 활용해 키를 구하게 된다.
CPA는 DPA에서 했던거 마냥 전력 트레이스를 몇천개 씩 수집할 필요가 없이 무려 수십에서 수백개만 캡쳐하면 된다!
이제 이를 이용해 AES의 키를 구하는 실습을 해보자.
펌웨어 분석
펌웨어는 AES 펌웨어 구현에 대한 DPA(Differential Power Analysis) 에서 사용한 펌웨어와 동일한 펌웨어이다.
/*
    This file is part of the ChipWhisperer Example Targets
    Copyright (C) 2012-2017 NewAE Technology Inc.

    This program is free software: you can redistribute it and/or modify
    it under the terms of the GNU General Public License as published by
    the Free Software Foundation, either version 3 of the License, or
    (at your option) any later version.

    This program is distributed in the hope that it will be useful,
    but WITHOUT ANY WARRANTY; without even the implied warranty of
    MERCHANTABILITY or FITNESS FOR A PARTICULAR PURPOSE.  See the
    GNU General Public License for more details.

    You should have received a copy of the GNU General Public License
    along with this program.  If not, see <http://www.gnu.org/licenses/>.
*/

#include "aes-independant.h"
#include "hal.h"
#include "simpleserial.h"
#include <stdint.h>
#include <stdlib.h>

uint8_t get_mask(uint8_t* m, uint8_t len)
{
  aes_indep_mask(m, len);
  return 0x00;
}

uint8_t get_key(uint8_t* k, uint8_t len)
{
	aes_indep_key(k);
	return 0x00;
}

uint8_t get_pt(uint8_t* pt, uint8_t len)
{
    aes_indep_enc_pretrigger(pt);

	trigger_high();

  #ifdef ADD_JITTER
  for (volatile uint8_t k = 0; k < (*pt & 0x0F); k++);
  #endif

	aes_indep_enc(pt); /* encrypting the data block */
	trigger_low();

    aes_indep_enc_posttrigger(pt);

	simpleserial_put('r', 16, pt);
	return 0x00;
}

uint8_t reset(uint8_t* x, uint8_t len)
{
    // Reset key here if needed
	return 0x00;
}

static uint16_t num_encryption_rounds = 10;

uint8_t enc_multi_getpt(uint8_t* pt, uint8_t len)
{
    aes_indep_enc_pretrigger(pt);

    for(unsigned int i = 0; i < num_encryption_rounds; i++){
        trigger_high();
        aes_indep_enc(pt);
        trigger_low();
    }

    aes_indep_enc_posttrigger(pt);
	simpleserial_put('r', 16, pt);
    return 0;
}

uint8_t enc_multi_setnum(uint8_t* t, uint8_t len)
{
    //Assumes user entered a number like [0, 200] to mean "200"
    //which is most sane looking for humans I think
    num_encryption_rounds = t[1];
    num_encryption_rounds |= t[0] << 8;
    return 0;
}

#if SS_VER == SS_VER_2_1
uint8_t aes(uint8_t cmd, uint8_t scmd, uint8_t len, uint8_t *buf)
{
    uint8_t req_len = 0;
    uint8_t err = 0;
    uint8_t mask_len = 0;
    if (scmd & 0x04) {
        // Mask has variable length. First byte encodes the length
        mask_len = buf[req_len];
        req_len += 1 + mask_len;
        if (req_len > len) {
            return SS_ERR_LEN;
        }
        err = get_mask(buf + req_len - mask_len, mask_len);
        if (err)
            return err;
    }

    if (scmd & 0x02) {
        req_len += 16;
        if (req_len > len) {
            return SS_ERR_LEN;
        }
        err = get_key(buf + req_len - 16, 16);
        if (err)
            return err;
    }
    if (scmd & 0x01) {
        req_len += 16;
        if (req_len > len) {
            return SS_ERR_LEN;
        }
        err = get_pt(buf + req_len - 16, 16);
        if (err)
            return err;
    }

    if (len != req_len) {
        return SS_ERR_LEN;
    }

    return 0x00;

}
#endif

int main(void)
{
	uint8_t tmp[KEY_LENGTH] = {DEFAULT_KEY};

    platform_init();
    init_uart();
    trigger_setup();

	aes_indep_init();
	aes_indep_key(tmp);

    /* Uncomment this to get a HELLO message for debug */

    // putch('h');
    // putch('e');
    // putch('l');
    // putch('l');
    // putch('o');
    // putch('\n');

	simpleserial_init();
    #if SS_VER == SS_VER_2_1
    simpleserial_addcmd(0x01, 16, aes);
    #else
    simpleserial_addcmd('k', 16, get_key);
    simpleserial_addcmd('p', 16,  get_pt);
    simpleserial_addcmd('x',  0,   reset);
    simpleserial_addcmd_flags('m', 18, get_mask, CMD_FLAG_LEN);
    simpleserial_addcmd('s', 2, enc_multi_setnum);
    simpleserial_addcmd('f', 16, enc_multi_getpt);
    #endif
    while(1)
        simpleserial_get();
}
위 코드가 꽤 긴데 아래 코드 부분에서 아래 부분만 보면 된다
    simpleserial_addcmd('k', 16, get_key);
    simpleserial_addcmd('p', 16,  get_pt);
첫번째 라인에서는 key를 입력 받고, 두번째 라인에서는 입력받은 평문과 첫번째 라인에서 입력 받은 key로 aes 암호화를 수행한다.
두번째 라인 코드 동작이 평문 16byte를 입력하면 get_pt에 인자로 전달하여 get_pt 함수를 호출한다.
uint8_t get_pt(uint8_t* pt, uint8_t len)
{
    aes_indep_enc_pretrigger(pt);

	trigger_high();

  #ifdef ADD_JITTER
  for (volatile uint8_t k = 0; k < (*pt & 0x0F); k++);
  #endif

	aes_indep_enc(pt); /* encrypting the data block */
	trigger_low();

    aes_indep_enc_posttrigger(pt);

	simpleserial_put('r', 16, pt);
	return 0x00;
}
코드를 보면 trigger_high();와 trigger_low();가 있는데
저 두개 사이에 코드를 실행하는 과정에서의 전력을 수집하게 된다.
	trigger_high(); // 전력 캡쳐 시작

  #ifdef ADD_JITTER
  for (volatile uint8_t k = 0; k < (*pt & 0x0F); k++);
  #endif

	aes_indep_enc(pt); /* encrypting the data block */
	trigger_low(); // 전력 캡쳐 종료
사이에 있는 코드를 보면 aes_indep_enc(pt)가 있는데 이부분이 AES 암호화 함수이다.
즉 입력한 평문에 대한 AES 암호화 과정에 발생하는 전력을 캡쳐하게 된다.
전력 트레이스 캡쳐
펌웨어에서 AES 암호화 과정의 전력 트레이스 캡쳐 코드는 아래와 같은데 AES 펌웨어 구현에 대한 DPA(Differential Power Analysis) 와 동작은 동일한 코드이다.
DPA와 다른 점은 전력 트레이스 캡쳐를 2000개에서 50개로 한다는 것이다.
from tqdm.notebook import trange
import numpy as np
import time

ktp = cw.ktp.Basic()
trace_array = []
textin_array = []

key, text = ktp.next()

target.set_key(key)

N = 50 #increase nano reliability
if PLATFORM=="CWNANO":
    N = 200
for i in trange(N, desc='Capturing traces'):
    scope.arm()

    target.simpleserial_write('p', text)

    ret = scope.capture()
    if ret:
        print("Target timed out!")
        continue

    response = target.simpleserial_read('r', 16)

    trace_array.append(scope.get_last_trace())
    textin_array.append(text)

    key, text = ktp.next()
    splot.update(scope.get_last_trace())

trace_array = np.array(trace_array)
동일한 키로 랜덤한 평문에 대한 암호화 과정의 전력 트레이스를 50개 캡쳐하는 코드이고, CPA에 사용할 전력 트레이스 캡쳐에 이용된 평문 또한 저장을 한다.
Exploit
먼저 첫번째 key바이트를 구하는 코드를 작성할 것인데 그전에 필요한 함수들 먼저 작성하겠다.
sbox = [
    # 0    1    2    3    4    5    6    7    8    9    a    b    c    d    e    f
    0x63,0x7c,0x77,0x7b,0xf2,0x6b,0x6f,0xc5,0x30,0x01,0x67,0x2b,0xfe,0xd7,0xab,0x76, # 0
    0xca,0x82,0xc9,0x7d,0xfa,0x59,0x47,0xf0,0xad,0xd4,0xa2,0xaf,0x9c,0xa4,0x72,0xc0, # 1
    0xb7,0xfd,0x93,0x26,0x36,0x3f,0xf7,0xcc,0x34,0xa5,0xe5,0xf1,0x71,0xd8,0x31,0x15, # 2
    0x04,0xc7,0x23,0xc3,0x18,0x96,0x05,0x9a,0x07,0x12,0x80,0xe2,0xeb,0x27,0xb2,0x75, # 3
    0x09,0x83,0x2c,0x1a,0x1b,0x6e,0x5a,0xa0,0x52,0x3b,0xd6,0xb3,0x29,0xe3,0x2f,0x84, # 4
    0x53,0xd1,0x00,0xed,0x20,0xfc,0xb1,0x5b,0x6a,0xcb,0xbe,0x39,0x4a,0x4c,0x58,0xcf, # 5
    0xd0,0xef,0xaa,0xfb,0x43,0x4d,0x33,0x85,0x45,0xf9,0x02,0x7f,0x50,0x3c,0x9f,0xa8, # 6
    0x51,0xa3,0x40,0x8f,0x92,0x9d,0x38,0xf5,0xbc,0xb6,0xda,0x21,0x10,0xff,0xf3,0xd2, # 7
    0xcd,0x0c,0x13,0xec,0x5f,0x97,0x44,0x17,0xc4,0xa7,0x7e,0x3d,0x64,0x5d,0x19,0x73, # 8
    0x60,0x81,0x4f,0xdc,0x22,0x2a,0x90,0x88,0x46,0xee,0xb8,0x14,0xde,0x5e,0x0b,0xdb, # 9
    0xe0,0x32,0x3a,0x0a,0x49,0x06,0x24,0x5c,0xc2,0xd3,0xac,0x62,0x91,0x95,0xe4,0x79, # a
    0xe7,0xc8,0x37,0x6d,0x8d,0xd5,0x4e,0xa9,0x6c,0x56,0xf4,0xea,0x65,0x7a,0xae,0x08, # b
    0xba,0x78,0x25,0x2e,0x1c,0xa6,0xb4,0xc6,0xe8,0xdd,0x74,0x1f,0x4b,0xbd,0x8b,0x8a, # c
    0x70,0x3e,0xb5,0x66,0x48,0x03,0xf6,0x0e,0x61,0x35,0x57,0xb9,0x86,0xc1,0x1d,0x9e, # d
    0xe1,0xf8,0x98,0x11,0x69,0xd9,0x8e,0x94,0x9b,0x1e,0x87,0xe9,0xce,0x55,0x28,0xdf, # e
    0x8c,0xa1,0x89,0x0d,0xbf,0xe6,0x42,0x68,0x41,0x99,0x2d,0x0f,0xb0,0x54,0xbb,0x16  # f
]

# AddRoundkey -> SubBytes 연산 바이트 결과 출력
def aes_internal(inputdata, key):
    return sbox[inputdata ^ key]

# 해밍 가중치 계산
def count_bit(n):
    tmp = bin(n)[2:]
    result = 0
    for i in range(len(tmp)):
        if tmp[i] == '1':
            result += 1
    return result

HW = [0]*0x100
for i in range(0x100):
    HW[i] = count_bit(i)
# 평균
def mean(X):
return np.sum(X, axis=0) / len(X)
# 분산
def std_dev(X, X_bar):
return np.sqrt(np.sum((X - X_bar)**2, axis=0))
# 공분산
def cov(X, X_bar, Y, Y_bar):
return np.sum((X - X_bar)*(Y - Y_bar), axis=0)
이제 상관관계 전력분석으로 키를 추측할 준비가 되었다.
전력 트레이스와 해당 전력 트레이스의 인풋으로 들어간 평문을 통해 계산된 해밍 가중치에 대하여
피어슨 상관계수를 계산해서 추측한 키 바이트 들 중에서 가장 큰 피어슨 상관계수를 가지는 키 바이트가 실제 키 바이트일 확률이 높다.
maxcpa = [0] * 256

# we don't need to redo the mean and std dev calculations
# for each key guess
t_bar = mean(trace_array)
o_t = std_dev(trace_array, t_bar)

for kguess in trange(0, 256):
    # 전력 트레이스 별 해밍 가중치
    hws = np.array([[HW[aes_internal(textin[0],kguess)] for textin in textin_array]]).transpose()
    # 피어슨 상관계수 계산
    hws_bar = mean(hws)
    o_hws = std_dev(hws, hws_bar)
    cpaoutput = cov(trace_array, t_bar, hws, hws_bar) / (o_t * o_hws) # 피어슨 상관계수
    # 피어슨 상관계수가 가장 큰 키 바이트 값을 저장
    maxcpa[kguess] = max(abs(cpaoutput))

guess = np.argmax(maxcpa)
guess_corr = maxcpa[guess]
print("Key guess: ", hex(guess))
print("Correlation: ", guess_corr)
실행 결과는 아래와 같다.
Key guess:  0x2b
Correlation:  0.8173391232407073
피어슨 상관계수가 0.8로 높은 선형관계를 가지는 것이 확인이 되며, 실제로 key의 첫번째 바이트는 0x2b이다.
이제 이거를 전체 키 바이트에 시도함으로 key를 구할 수 있다.
아래 코드는 전체 key를 구하는 코드이다.
t_bar = np.sum(trace_array, axis=0)/len(trace_array)
o_t = np.sqrt(np.sum((trace_array - t_bar)**2, axis=0))

cparefs = [0] * 16 #put your key byte guess correlations here
bestguess = [0] * 16 #put your key byte guesses here

for bnum in trange(0, 16):
    maxcpa = [0] * 256
    for kguess in range(0, 256):
        hws = np.array([[HW[aes_internal(textin[bnum],kguess)] for textin in textin_array]]).transpose()

        hws_bar = mean(hws)
        o_hws = std_dev(hws, hws_bar)
        cpaoutput = cov(trace_array, t_bar, hws, hws_bar) / (o_t * o_hws)
        maxcpa[kguess] = max(abs(cpaoutput))
    guess = np.argmax(maxcpa)
    guess_corr = max(maxcpa)
    bestguess[bnum] = guess
    cparefs[bnum] = guess_corr

print("Best Key Guess: ", end="")
for b in bestguess: print("%02x " % b, end="")
print("\n", cparefs)
실행 결과
Best Key Guess: 2b 7e 15 16 28 ae d2 a6 ab f7 15 88 09 cf 4f 3c
 [0.8173391232407073, 0.9030729352975957, 0.8680806909344858, 0.7995373492575402, 0.8243811310168592, 0.7608034854021246, 0.7429726857312415, 0.8331801334491702, 0.6852843898419178, 0.8347826040144956, 0.7460641946670441, 0.8457679300530341, 0.7408694505702236, 0.7353281646786196, 0.7954627594905972, 0.7370366760629835]
실제 펌웨어에 사용된 키는 2B, 7E, 15, 16, 28, AE, D2, A6, AB, F7, 15, 88, 09, CF, 4F, 3C 로
CPA를 통해 얻은 키와 동일한 것을 확인할 수 있다.
'Side Channel Analysis' 카테고리의 다른 글
| 해밍 가중치와 전력 소비의 관계 (2) | 2026.04.05 |
|---|---|
| AES 펌웨어 구현에 대한 DPA(Differential Power Analysis) (4) | 2026.03.23 |
| ChipWhisperer Husky (0) | 2026.03.14 |


